How to build a high-quality home studio:
Our 5-step guide

Want to build a home studio that enables you to create high-quality, great-sounding recordings and mixes? You've come to the right place!
Getting the best possible results from your build requires that many things be considered, from selecting the right studio equipment to applying suitable room acoustic treatment.
By reading this page and watching our exclusive video, you’ll learn the essential knowledge and basic advice needed to help you make your ideal home studio.
So, let’s get started!
1. Essential home studio gear
• Computer: The central hub for your audio recording software, which is also known as a DAW.
• Audio interface: Provides high-quality inputs and outputs for sound signals.
• Monitoring loudspeakers: A stereo pair of monitors for your main sound reproduction, allowing you to listen critically to recordings and mixes over the widest part of the frequency spectrum.
• Subwoofer (optional): A suitable subwoofer designed to complement your monitors will allow you to listen critically lower down in the frequency spectrum – and increase the performance of your monitors.
• Professional headphones: For monitoring while recording with a microphone, and for complementary monitoring of the mix.
• Microphone/s: Tailored to your recording needs, whether for vocals or instruments.
• USB MIDI controller and other instruments: Depending on your personal sound.
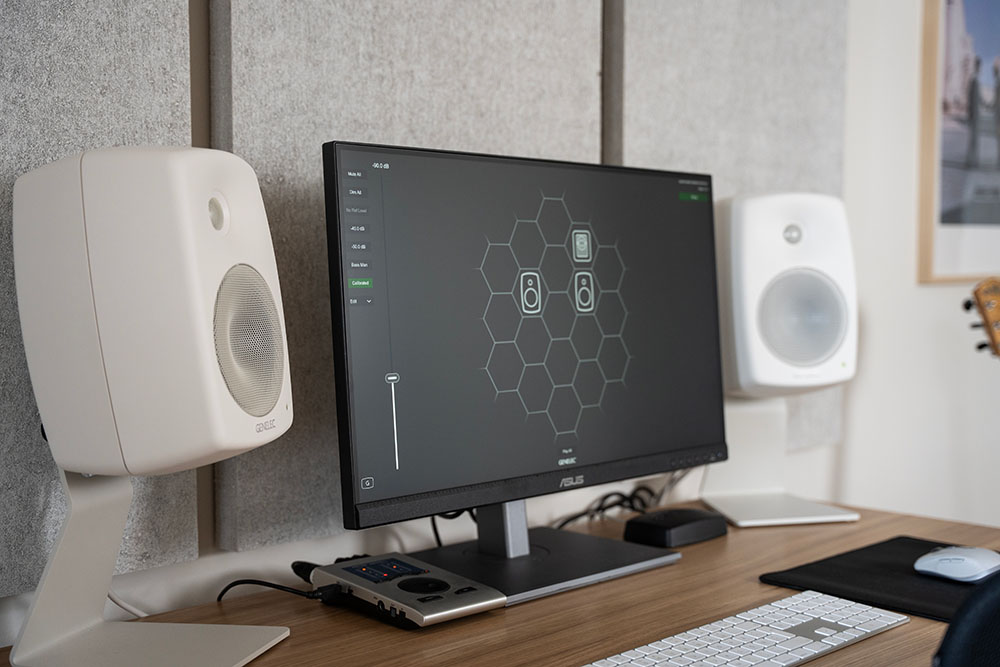 Genelec 8330A SAM studio monitors with GLM software
When budgeting for your studio, remember that the quality of the monitors you use will determine much of your ability to understand how recordings and mixes really sound. At the same time, consider that equipment forms only one part of the equation – good room acoustics also contribute a lot towards a great-sounding and reliable studio space.
2. Selecting your studio room
Choose a rectangular-shaped room
Square rooms are challenging to create audio in and to treat acoustically due to their tendency to create standing waves (room modes) from sound reflections. Such standing waves negatively affect the reliability of the listening experience. Instead, if you can, opt for a rectangular room with walls made of soft materials like wood or plasterboard – rather than stone or concrete – as this will reduce the level and effect of sound reflections.
Create a symmetrical setup in the room's end third
Imagine your space divided into three equal sections, and decide which of the two ends is going to be the front end – where you'll position your listening setup. When doing this, avoid any end that has clear inconveniences like protruding doors or fixed furniture. Place your listening position centrally along the side-to-side axis of the chosen front end of the room. Aim to create a symmetrical monitoring setup there, considering the position of your desk and the relative position of nearby walls. Doing all of this will help to balance the sound field around the listening position.


3. System placement and room acoustics
Place the monitors close to the back wall
Place monitors close to the back wall to avoid cancellation dips. Aim the monitors in towards the listening position at 30-degree angles and place them at an equal distance from each other and the listening position to form an equilateral triangle.
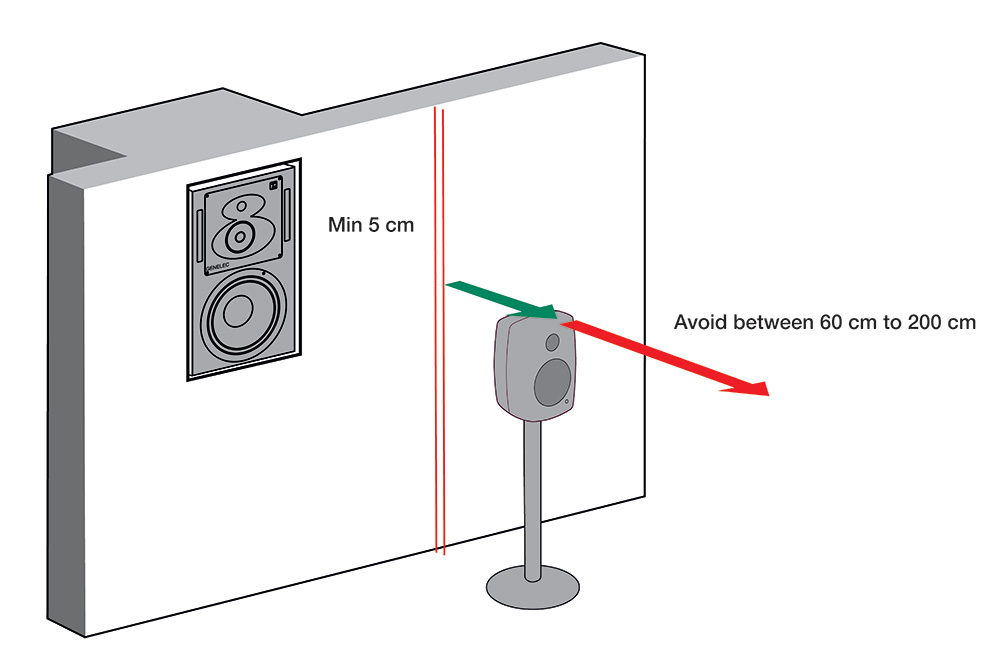
Typically the distance from the monitor front to the wall should be less than 60 centimetres.
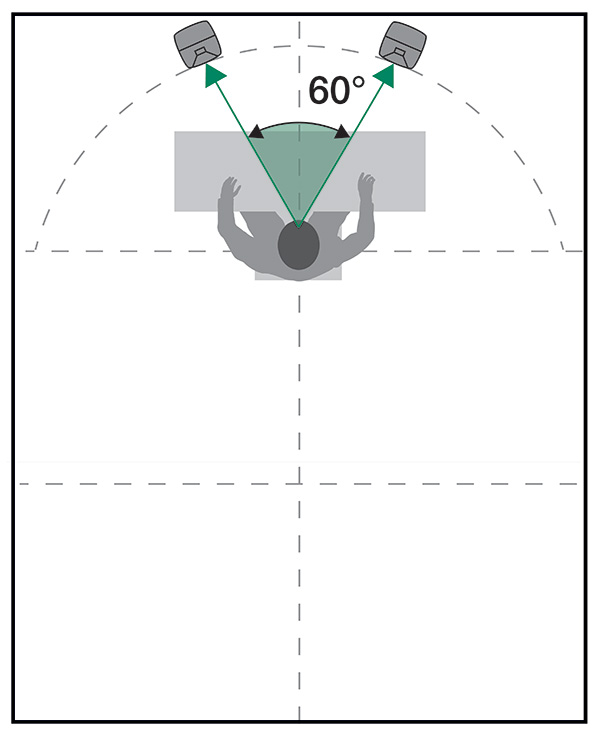
The angle between the left and right monitors should be 60° degrees. Here we also see the setup placed correctly (symmetrically) in the chosen front end third of the room.
Place the subwoofer close to the back wall too
Position the subwoofer slightly off centre along and close to the back wall to help ensure reliable low-frequency performance.
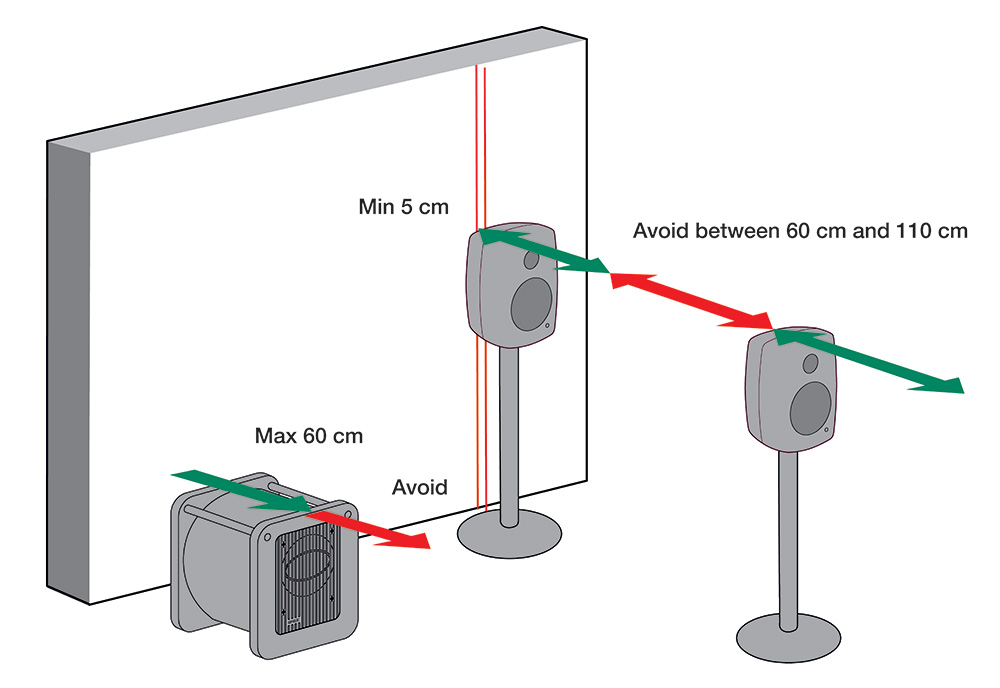 Typical recommended distances from the wall behind monitors and subwoofer.
Sound reflections affect reliability
When audio played back by the monitors is reflected from walls, this causes colourations, which change how the audio sounds. Properly designed and positioned acoustic panels and bass traps can reduce these reflections, helping to preserve the original character of the sound produced by the monitors. Thick panels are required for low-frequency absorption, while heavy curtains, carpets and strategically placed soft furniture can help to control high frequencies.
 The distance from the wall where the monitors are placed can be very significant to the quality of sound. Changing this distance directly affects the colour of the sound.
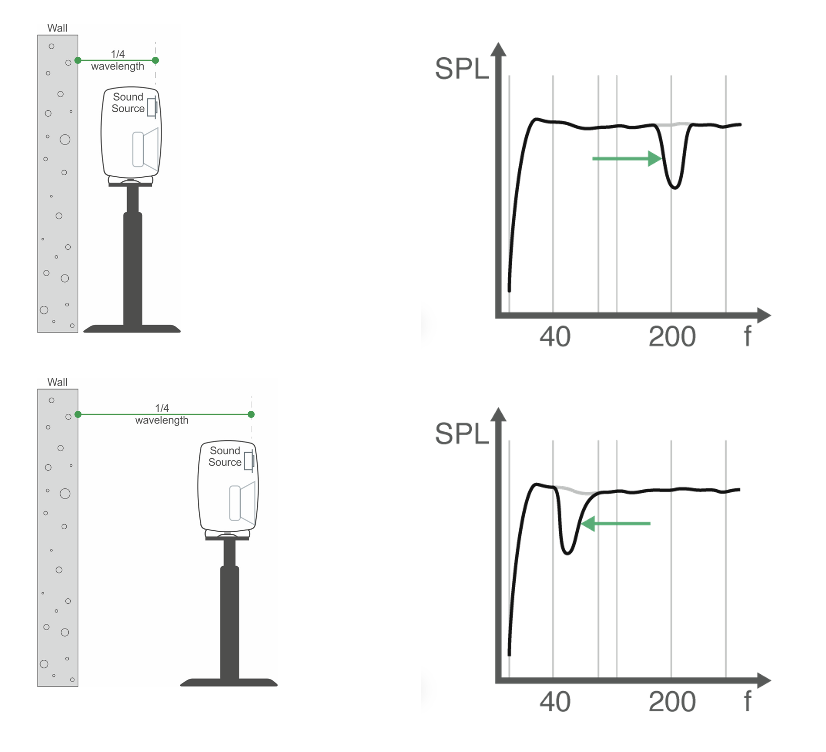
Placing the monitors or subwoofer too far from the wall causes back-wall reflections to reduce the perceived level of low frequencies, and this cannot be fixed properly with playback adjustments.
Bass is the hardest to get right
Troublesome standing waves usually occur in the low frequencies. When they occur, it makes it very difficult to trust what you’re hearing and make the right mixing decisions. A rectangular room with soft materials – and adding bass traps where possible – will help. Using a subwoofer also helps greatly, allowing better control and optimisation of low-frequency reproduction.
It’s also important to pay attention to the bass levels in the room. Low frequencies are omnidirectional (emitted in every direction) and will naturally build up when loudspeakers or subwoofers are placed near any type of solid wall – increasing the perceived level of bass. This effect is preferred over placing loudspeakers or subwoofers far from walls, as it is easy to compensate for increased bass by simply adjusting the level of the loudspeaker or subwoofer’s low-frequency playback. Increasing bass level playback to try and compensate for low-frequency cancellation (reduced or missing bass caused by placing loudspeakers or subwoofers too far from the back wall) is not effective.
To help with managing sound reflections, many Genelec monitors and subwoofers feature easy-to-use DIP Switches that enable simple manual adjustment of their frequency response, while our Smart Active Monitors (SAM) automate adjustment for you.
For more information, watch our webinar below:
4. Smart Active Monitoring (SAM) and calibration
Automated room adaptation
SAM monitors work with Genelec GLM software’s AutoCal algorithm to automatically adapt to the unique acoustics of the space and the position of the system within it. This saves you time compared to manual optimisation, reduces the need for acoustic treatment, and results in a highly reliable monitoring system you can trust to tell you the truth when you record and mix.
For example, pairing our 8330 SAM Monitors with a 7350 SAM Subwoofer ensures a truthful listening experience, even in a challenging acoustic environment – giving you the possibility to consistently create great-sounding mixes.
 Genelec 8351B studio monitors with GLM software
GRADE Report for nailing the final touches
GLM software offers the possibility to create GRADE Reports that provide detailed insights about how your SAM Monitoring system is performing in your room. This allows you to understand exactly where and how your room and setup can be improved, so you can get the very best out of your SAM Monitoring system by positioning it optimally and adjusting the acoustic treatment in your space.
Each GRADE Report includes a brief summary of its key findings in a simple colour-coded table for quick reference and easy understanding.
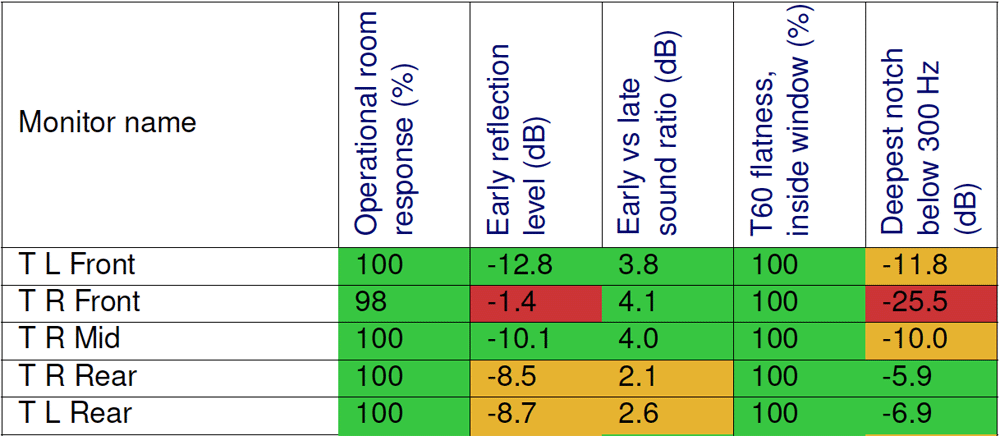 Green shows excellent system performance. Yellow shows good system performance, but some improvements may be possible. Red shows where improvements could significantly enhance your system.
GRADE’s Frequency Response graph helps you further understand how your SAM system initially interacted with your room and how the GLM calibration has improved its performance. GLM’s correction aims to provide a flat, neutral response, giving you the best possible foundation to create consistently well balanced mixes.
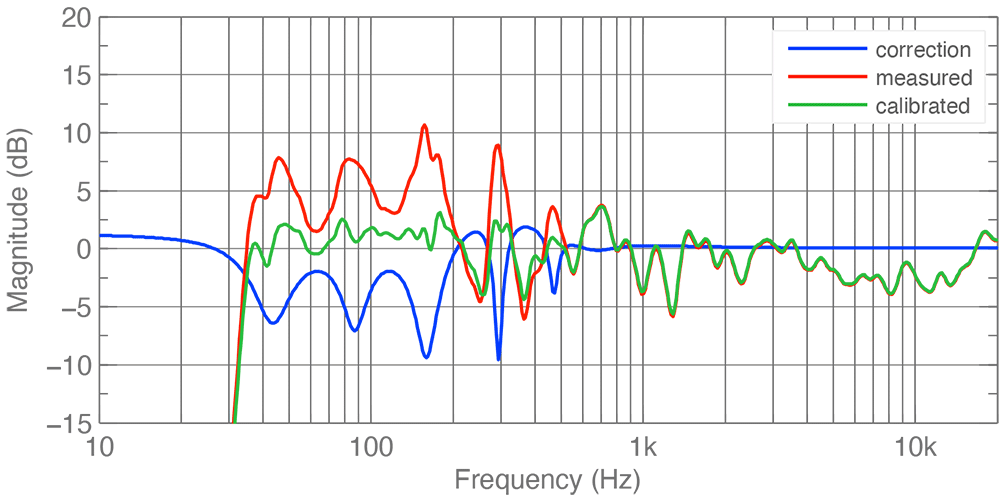 Red shows the measured frequency response of your SAM Monitoring system, blue shows GLM's corrective filtering, and green shows the response after correction.
5. Stay open to improvements
• Use acoustic tools to re-evaluate the space: Use helpful tools like our GLM software and its GRADE Reporting feature to measure, understand and improve your room’s acoustic performance, both before and after making changes.
• Upgrade acoustic treatment: As your journey continues, perhaps you’ll unlock extra budget to put towards acoustic treatment improvements for your room. These might be bulkier absorptive materials or thicker panels that improve low-frequency control, which are often challenging to acquire when you first build your home studio.
• Add items for comfort and inspiration: Make your studio more inviting with a vibe that helps to power your creativity. High-quality studio tools – like Genelec audio monitoring – are essential, yet other elements like personal decor, mood lighting, ergonomic furniture and cherished instruments can really help to fire you up your audio-making engines.
Time to get creative
Be sure to learn more about Genelec’s renowned studio monitoring solutions by clicking here.


